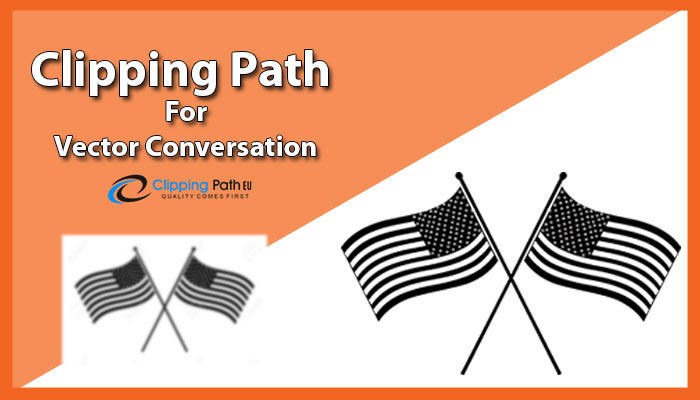
Clipping Path For Vector: A cut-out way is a shut vector way which is utilized to remove some portion of a photo picture altering programming. After the way is connected, the yield will contain just the segment of the picture inside. Anything outside the way will be expelled. Generally cutting ways are expected to get ready pictures for outlines.
The most widely recognized undertaking is to expel the foundation from a picture and join the rest of the segment of the first picture with another. Section ways are put away in Adobe picture asset hinders in TIFF, JPEG, and PSD picture positions. While performing geometrical raster changes on pictures Graphics Mill can apply a similar arrangement of changes on cut-out way information. This enables you to keep the vector ways synchronized with the raster information. Clipping path is the first factor for vector conversation. After reading this article you can realize why need
Clipping path for vector?

Replicating the Clipping Path
On the off chance that you have to change a picture to another arrangement, say JPEG to TIFF. Would prefer not to lose its cut-out way information you can simply duplicate it. There are two approaches to duplicate the section way information:
Using a picture author. You separate metadata from an Image Reader protest. Spare it to an Image Writer instance utilizing the pipeline API. The case for this technique is displayed on the second scrap. More about advanced clipping path service.
Using picture settings. You can make a Writer Settings example, put Adobe picture asset pieces containing a cut-out way in it, and pass the question to the Bitmap. Save strategy.
Prologue to Raster record and Vector File:
Raster picture and vector picture are really two variations of picture organize. Raster records or bitmaps use pixels to make a picture. While Vector picture documents depend on ways to make a picture. Since ways are numerically based, these documents don’t misshape upon re-estimating and are perfect for content and different pictures in which exactness is vital. On the off chance that you have a bitmap picture. It is conceivable to change it into a vector picture with Adobe Illustrator.
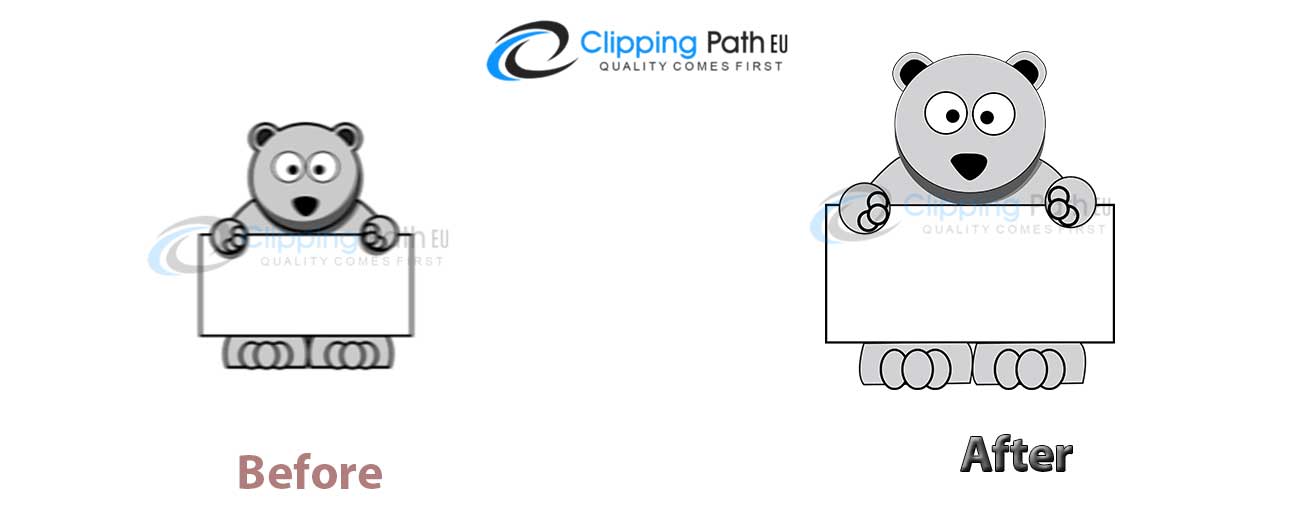
What to Do with Vector Conversion:
How about we think about your organization logo. You will utilize the logo for a huge number of reason. It can be for printing or for utilizing on the web. Here and there you require it 250px x 250px and here and there you require it 1000px x 1000px. On the off chance that you will utilize raster picture, for this reason. Your logo is going to crush on the grounds that. When you are going to re-estimate you logo from 250×250 to 1000×1000 if will be burred. For this situation, the Vector picture is a definitive arrangement. Simply make a solitary vector rendition of your logo and re-estimate it whatever size you require. Indeed, even vector record guarantees the best quality when will utilize it for printing.

The most effective method to Do Raster to Vector Conversion:
Vector change, or changing over Raster pictures to Vector pictures. Should be possible utilizing the accompanying advances.
Stage one:
Select the picture that you need to change over. Draw a way around each protest. Utilize the ‘Enchantment Wand Tool’ at in the first place, which can be chosen from the primary toolbar. On the off chance that the picture you need to change over isn’t extremely intricate. For example, the picture of a cricket bat, Magic Wand device will have the capacity to effectively recognize the edges of the protest and draw an exact way around it. On the off chance that this doesn’t work, at that point. You can pick ‘Attractive Lasso Tool’ or ‘Confined Tool’. From the toolbar and follow the edges of the question until the point when it completely encased in lines. This apparatus will snap to the edges of the question, subsequently giving an extremely exact following.
Stage two:
Once you have made a required shape for the protest you can apply any shading or angle or impact into the choice to influence vector to record. Keep in mind, you need to influence distinctive determination for applying diverse to shading. You can likewise make it 3D by applying proficient slope.
Stage Three:
Save the document, which will be spared as an Adobe Illustrator vector record.
Stage Four:
Correct the picture on the off chance that it isn’t as exact as you need it to be. There will in all likelihood be a couple of regions along the way that has been made that doesn’t look as smooth as the first picture. This happens in some cases in raster to vector change benefit by our group or vector transformation work by your own. You can without much of a stretch fix the record by opening it in Adobe Illustrator to make it indistinguishable to the master document. Following these five stages ought to guarantee that you can complete Raster to Vector transformation. Section Mask Asia has an extraordinary group who can give you raster to vector change benefit whenever with the most aggressive rate.

Learn more: Illustrator image editing service | raster to vector image
Clipping Path EU Ltd is the best image editing service provider as your quality service provider.
Learn more:


